You can install the Clippa theme in two ways:
-
Directly through the WordPress Dashboard (recommended for most users)
-
Manually via FTP (advanced users)
Before you begin, make sure WordPress is already installed on your server. If not, please refer to the official WordPress Installation Guide.
Method 1: Install via WordPress Dashboard (Recommended)
-
Log in to your WordPress Admin Panel.
-
Navigate to:
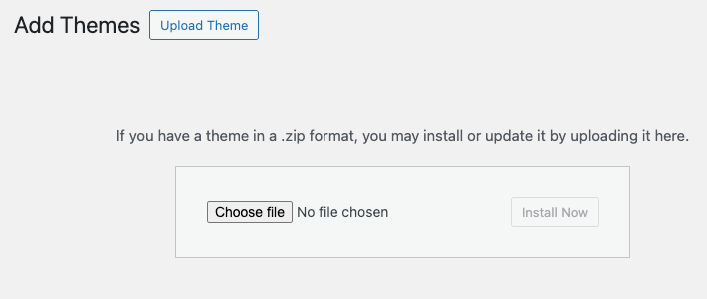
Appearance → Themes → Add New → Upload Theme -
Click Choose File, select the
clippa.zipfile from your downloaded package. -
Click Install Now.
-
Once installed, click Activate to enable the theme on your website.
Method 2: Install via FTP (Manual Installation)
-
Unzip the
clippa.zipfile on your computer. -
Using an FTP client (such as FileZilla), connect to your server.
-
Upload the unzipped
clippafolder into:wp-content/themes/directory. -
After uploading, log in to your WordPress Admin Panel.
-
Navigate to:
Appearance → Themes and activate the Clippa theme.
Installing Required Plugins
After activating the theme, you will see a notification at the top of your admin panel suggesting you install and activate required and recommended plugins.
-
Click Begin installing plugins.
-
Select all plugins and click Install, then Activate after installation is complete.
These plugins are necessary for full functionality and demo import.
